Advanced git commands
Guidance on using git commands to alter your version control history
As outlined in the Git best practices guidance the Git commit history should be regarded as a living, dynamic history, rather than a static record. To create a well-formed commit history, you will inevitably need to amend, drop, and re-arrange commits as you work on a feature. Luckily, Git comes with a full suite of commands designed expressly for this purpose.
1. Anatomy of a commit
This section looks at the structure of the commit at a deeper level, providing context to better understand some of the more advanced git commands.
Git is a type of Version Control System (VCS), tracking changes made to code over time. While some systems store version history as a series of changes, Git takes a snapshot of the entire code-base whenever a change is recorded. This snapshot is the Git commit.
1.1 The commit object
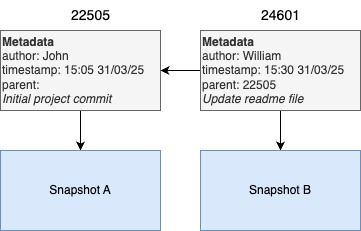
The commit object can be viewed as a collection of metadata - e.g. author, timestamp of change, commit message - combined with a set of pointers. These pointers include a pointer to the snapshot of the code when the staged changes were committed, and a pointer to the previous commit known as the parent.
See the example below of a commit with ID 24601. It contains metadata that the author was William, it was committed at 3:30pm on 31 March 2025, and a description of the commit: "Update readme file". The commit also contains pointers to a snapshot of the code-base at the time of the commit after changes were made (snapshot B), plus a pointer to the ID of the previous, or parent, commit: 22505. You will note the previous commit has an earlier timestamp and a different author, implying William is building off John's work.
1.2 The commit ID
Each commit has a 40 character hexadecimal ID, which specifies a SHA-1 hash value. SHA-1 is a type of hash function. A hash function takes data of an arbitrary size and maps it to a corresponding fixed-sized hash value (in this case, a fixed size of 40 characters) based on the contents of the data. This is the key point to understand. If anything about the commit's contents changes, including the contents of the metadata, then a new commit ID will be generated, essentially creating a new commit.
TipWhile the full git commit ID is forty characters, you will often see it presented within the terminal as just the initial 6-8 characters to enhance readability. The example above also uses the abbreviated ID.
2. Amend
This section covers how to amend the latest commit in your commit history
2.1. Amending code
git commit --amend --no-editAfter staging your changes, run a commit with the --amend option to amend the code in your latest commit. The --no-edit option signifies you do not wish to alter the commit message.
Example
You just committed the following code to add a table:
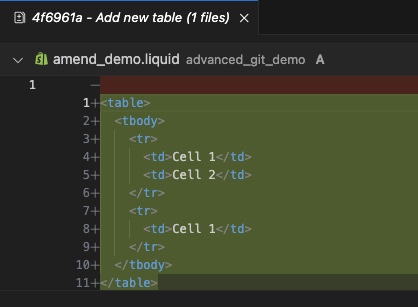
You then notice the second row has the wrong number of cells. Rather than creating a new commit for the fix, you can use the --amend option to instead update your last commit, inserting the missing <td> element:
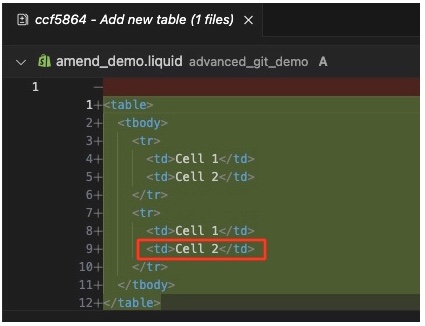
You will note the above commit has the same commit message and contains all the previous changes, as if no mistake had been made. By using the --amend option we reduce the size of our commit history and preserve the integrity of our commits.
2.2. Amending the commit message
git commit --amend -m "Some updated commit message"To amend a commit message, leave out the --no-edit option. You can either use the -m option to provide the new message or simply input the new message in the subsequent prompt.
Example
You have committed code to add a header to a table, but the commit message is wrong ("Add table footer"):
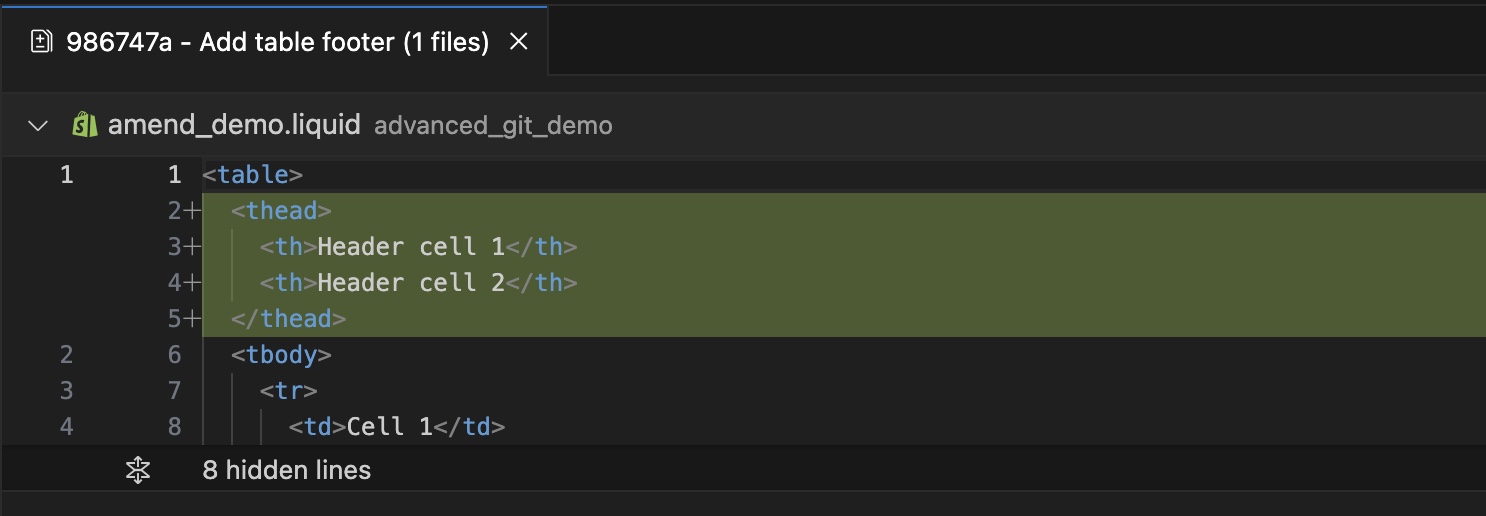
Using git commit --amend, you are prompted to input the amended commit message:

Your commit history will now reflect the amended message:
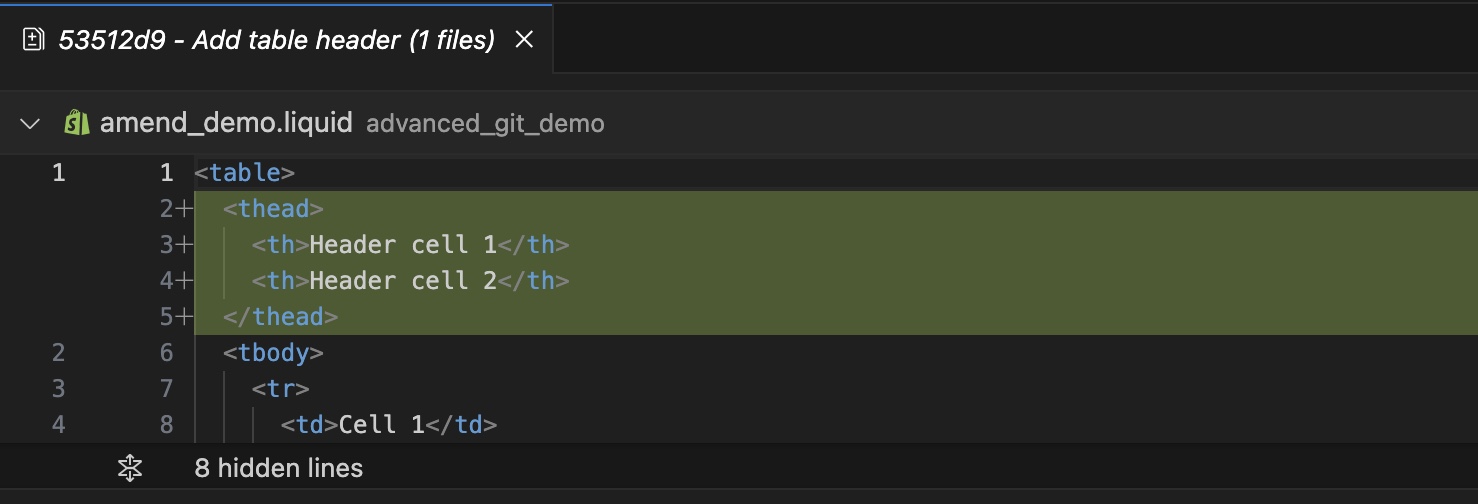
Being able to amend our messages allows us to craft the descriptive git messages essential for a well-formed git commit history.
TipStaging changes to the code and using the
git commit --amendcommand (AKA excluding the--no-editoption) allows you to amend the code and message of a commit simultaneously
3. Reset
Section under construction
4. Interactive rebase
This section covers how to amend your entire commit history
4.1 Introduction
Technically, it is not actually possible to edit a commit. When you see a commit has been "amended" what is actually happening is the old commit is dropped and a new commit, containing the code of the old commit plus your amendments, replaces it. Per section 1.2, the commit ID is generated from the contents, so when the contents change, so does the ID, ostensibly generating a new commit.
We see this in the example laid out in part 2.1. The initial commit "Add new table" has an ID of "4f6961a" while the amended commit has an ID of "ccf5864". The commit IDs are different because these are different commits, rather than the same commit updated.
For the git commit --amendcommand, the above process is relatively straightforward. Git will always drop and replace the latest commit. However, what if we want to edit our commit history further back than the latest commit? Enter: The interactive rebase.
WarningBefore starting to use interactive rebase, you will likely need to set up your git configuration with a default code editor to enable the interactive rebase functionality. If you are using VS Code, please see section 4.5 for guidance.
4.2 How it works
Rebasing is the process moving a sequence of commits to a new base commit. The most typical use case is rebasing a feature branch onto the main branch, when there have been further commits to the main branch while the feature branch was being developed.
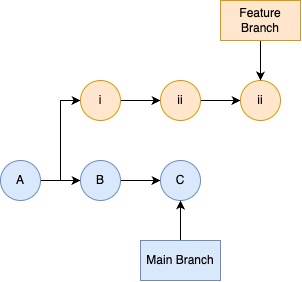
In the example below, we see when the feature branch was started, its base was Commit A . However, since work began, there have been two further commits to the main branch: Commits B and Commits C, meaning ourfeature branch it now outdated.
Pre-rebase
Post-rebase
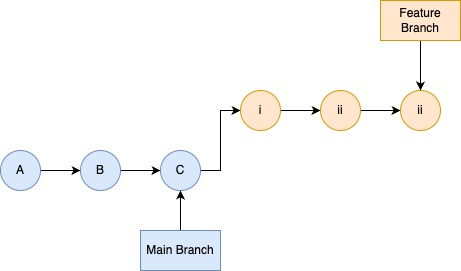
When the feature branch is rebased ontomain using the command git rebase main, the following actions occur:
- A copy of all changes on the
featurebranch - AKA Commits i, Commit ii, and Commit iii - are saved in a temporary area. - The
featurebranch is reset to the new base: Meaning the base will change from Commit A to Commit C. The reset will cause all changes to be dropped, hence why a copy of these commits was made earlier. - All changes saved in the temporary area will be reapplied to the
featurebranch.
Following the rebase, the feature branch now contains all the new changes made to the main branch as though they were present from the beginning of the development process.
Interactive rebase
A regular rebase will reapply the feature branch commits automatically. However, running an interactive rebase will allow you to manually reapply each commit one-by-one. This will give you the opportunity to amend, drop, rearrange, or merge each commit in your commit history as you desire.
4.3 Choosing a starting point
git rebase -i <new-base>You run an interactive rebase using the regular rebase command and adding the option --interactive/-i.
If you rebase onto another branch, you will be able to edit your entire feature branch commit history - as rebasing onto another branch leads to all feature branch commits to be reapplied.
If you wish to make a more surgical amendment - for example in a feature branch of 10 commits, edit the 7th commit - you should instead rebase off a commit within the feature branch itself.
Continuing our example, by running the command git rebase -i <commit-6-id>, only commits 7 to 10 will be reapplied, meaning you will not need to waste time processing commits 1 to 6, which you know will be unchanged.
You can access your commit history via the command git log --oneline. The --oneline option condenses each commit log entry to a single line, including abbreviating the 40-character commit hash to the first 6 characters.

Above is a sample commit history to create a simple table. Let us say we want to edit the commit "Add currency row in header". In this case, we should rebase onto the prior commit, "Add footer", as all commits after the new base will be reapplied.
There are two methods to reference the "Add footer" commit.
Option 1 - Reference by ID
Reference "Add footer" by its hash: git commit rebase -i d16179c
Option 2 - Reference by Position
Reference "Add footer" by its position from the branch HEAD, via HEAD~n
"Add footer" is 4 commits behind the HEAD: git commit rebase -i HEAD~4
4.4 Running the interactive rebase
When running the interactive rebase, a pop-out window will be launched with a list of the commits to be reapplied. Next to each commit you can specify an action. Once all actions have been selected, press the "Start Rebase" button.
| Command | Description |
|---|---|
pick | No changes to commit required |
reword | Edit commit message |
edit | Edit commit contents |
squash | Meld commit and commit message with previous commit and commit message |
fixup | Same as squash, but discard the commit message |
drop | Remove commit |
Worked example
Let us return to our sample code constructed a simple table, and the associated commit history, from above.
Pre-interactive rebase
Before running the interactive rebase, the code and commit history read as follows:
Code
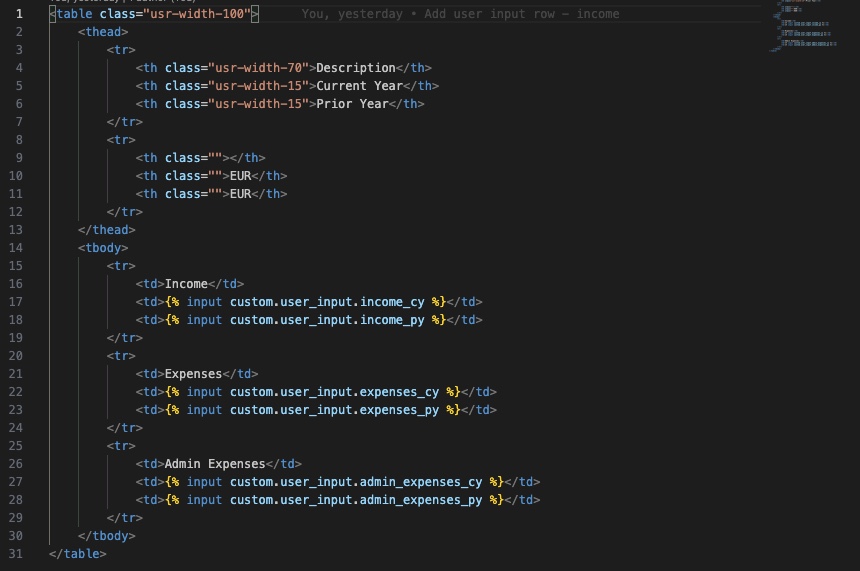
Commit history
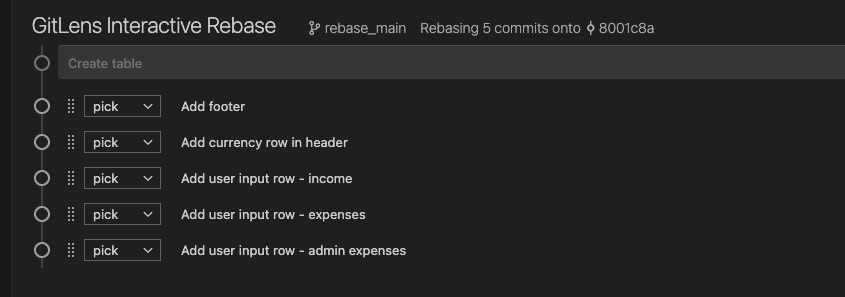
We want to edit the commit history as follows:
- Update the name of Git commit message "Add footer" to "Add header"
- Amend the commit contents of "Add currency row in header" so the currency displayed is "GBP" rather than "EUR"
- Meld commits "Add user input row - income" and "Add user input row - expenses", and change commit message to "Add user input rows" so it represents a single logical change
- Remove the commit "Add user input row - admin expenses" following stakeholder feedback
As such, we set up our interactive rebase as follows:

The next section details how each of these actions is executed once the interactive rebase is started.
Reword
Update the name of Git commit message "Add footer" to "Add header"
Original commit

Interactive rebase
A pop-out window will be launched containing the old commit message

We type in the new commit message, save, and then exit the pop-out window

The commit is reapplied as a new commit with the same contents, but an altered commit message

Edit
Amend the commit contents of "Add currency row in header" so the currency displayed is "GBP" rather than "EUR".
Original commit

Interactive rebase
When the interactive rebase comes to a commit to edit you should take the same actions as you would when amending a commit:
- Make the needed updates to the code
- Stage the changes using
git add - Commit the amendment using
git commit --amend(adding the--no-editoption if the git commit message will remain unchanged)
Then repeat the above cycle until you are satisfied all necessary changes to the commit are complete. Once you are satisfied with your edit, enter git rebase --continue to proceed with the next commit to be reapplied.
Below is the edited "Add currency row in header" commit with the currency changed to "GBP":

Squash
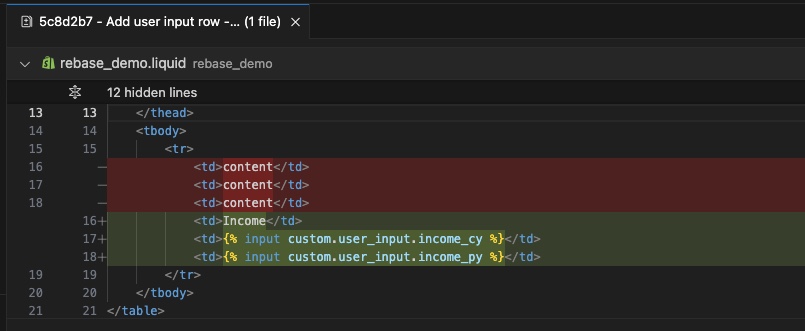
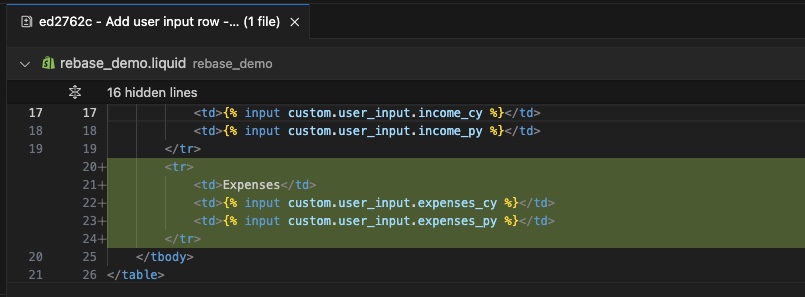
Meld commits "Add user input row - income" and "Add user input row - expenses", and change commit message to "Add user input rows" so it represents a single logical change.
Original commits
Interactive rebase
Similar to the reword option, a pop-out window will be launched containing the suggested commit messages, which will always be a combination of the messages of the commits being melded together.

As before, the commit message can be updated - in this case to "Add user input rows"

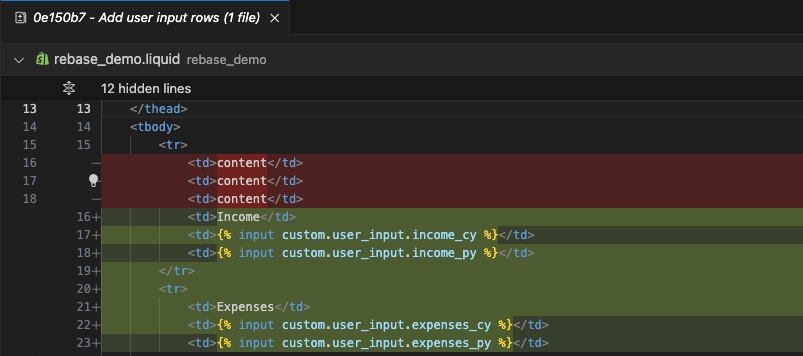
Below is the newly squashed "Add user input rows" commit - a combination of the "income" and "expenses" commits:
Drop
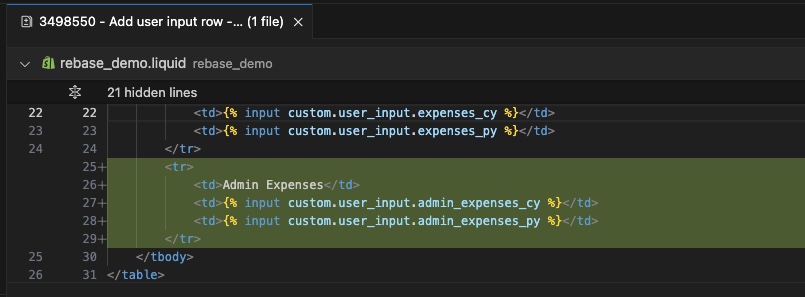
Remove the commit "Add user input row - admin expenses" following stakeholder feedback.
Original commit
Interactive rebase
When the interactive rebase is run, the above commit will simply be dropped from the commit history.
Post-interactive rebase
After running the interactive rebase, the code and commit history now appear as follows:
Code

Commit history

4.5 Setup VS Code for interactive rebase
WarningThis section is specifically for setting up the interactive rebase functionality on VS Code. For developers using a different IDE, not all the guidance may be relevant.
Git needs to be able to access VS Code in order to launch the necessary pop-out windows for the interactive rebase. The steps to grant Git access to VS Code are outlined below.
Step 1 - Confirm whether VS Code CLI installed
The Git CLI will interact with VS Code CLI. Therefore, we first need to confirm the VS Code CLI is installed.
You can check if VS Code installed using the command code -v

If the command returns the version number, please skip ahead to step 3. Otherwise, if you receive an error message please proceed with step 2 to install the VS Code CLI.
Step 2 - Install VS Code CLI
Access the VS Code command palette using cmd+shift+p (or ctrl+shift+p on Windows). Then select the command to "Install 'code' command in PATH" and run it to install the VS Code CLI.

You can test whether the installation was successful by re-running the command code -v.
Step 3 - Link the VS Code CLI with the Git CLI
Link your Git CLI to the VS Code CLI by running the command git config --global core.editor "code --wait".
Git will then use VS Code to launch the pop-out window required for the interactive rebase.
Tip
coderefers to VS Code, and the--waitoption ensures Git waits for VS Code to close any pop-out windows before proceeding with whatever task is underway (AKA the interactive rebase)
Step 4 - Install Git Lens extension
Finally, we highly recommend installing the Git Lens extension, which provides a much more user-friendly UI for interactive rebasing. All screenshots above were from a copy of VS Code with Git Lens enabled.
5. Fixup!
This section covers how to flag changes made after a code review.
5.1 Flagging a change
git commit --fixup <commit-ID>After completing work on a feature branch, you will likely send the pull request to a colleague for code review. After completing the review, they may advise on some changes to the code. Pre-supposing your agreement with the reviewer's comments, you will need to make these changes and then send the pull request back once more for review.
How though to highlight these amendments so the reviewer can easily understand the changes when you send them for second review? The answer: git commit --fixup.
The fixup option will generate a commit which references a previous existing commit. This works particularly well in conjunction with a well-formed git commit history, as each commit will be a single logical unit with a clear purpose. Therefore you can easily tie your amendments to the relevant parent commit.
In the example below, a review comment comes back, requesting classes are added to the currency row to centre the text:
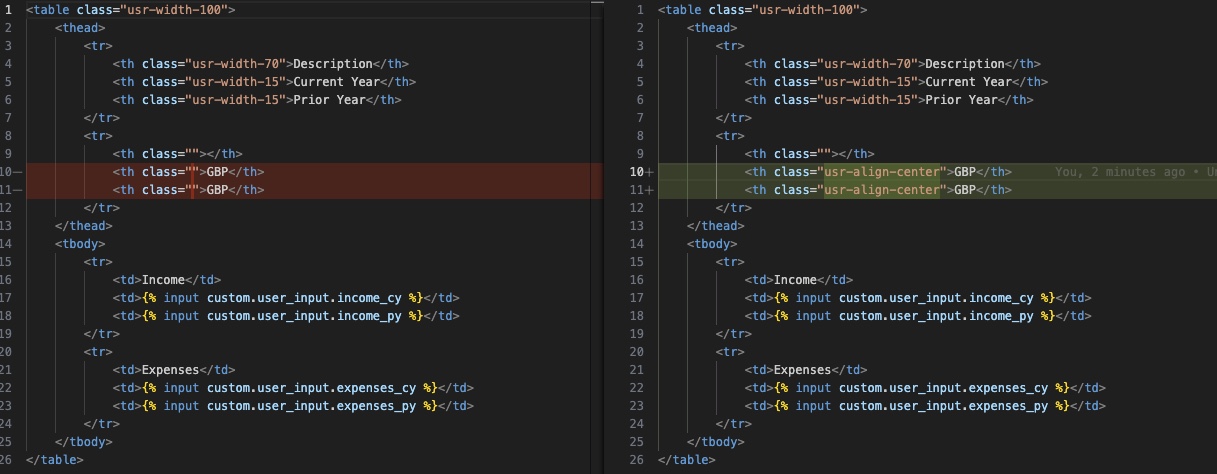
Looking at the git history you see there is already a commit with the description "Add currency row in header":

Using this commit's ID, you stage your changes and run git commit --fixup 36d1019. This adds a new commit which is automatically uses the parent commit's description and attaches the prefix "fixup!":

When the pull request is then sent to the reviewer for second review they can easily identify both which commits contain the new amendments and - if the history is well-formed - what part of the code those amendments relate to.
5.2 Autosquash
git rebase -i <new-base> --autosquashIf the second review passes, no further action is likely required. However, if further changes are required, a new problem arises: How to distinguish your fixup amendments following the first code review and those following the second code review? The solution is to run an interactive rebase with the --autosquash option enabled.
Running an interactive rebase with --autosquash will automatically move and meld any fixup commits into their relevant "parent" commit, leaving you with a clean slate to make the next set of amendments. When running the interactive rebase, you should set the new base before any "parent" commits.
Continuing our example from section 5.1, lets say your feature branch returns from second review with a request for further changes, meaning you need to clear the git history of the current fixup commits.
You run an interactive rebase, setting the new base as the "Add header" commit as this is before the "Add currency row in header" commit:
git rebase -i 0635ece --autosquashGit automatically moves the "fixup! Add currency row in header" commit to its parent commit and prepares to squash it.

After running the interactive rebase, thefixup commit has been melded into its parent commit. You will note the change in commit ID from 36d019 to b8a3489 due to the change in content:

The commit "Add currency row in header" will now appear to have always contained the change to centre the text:

By using --autosquash the slate is now clean for you to add further fixup commits to communicate the changes made following the second code review. Used in this manner fixup commits always represent the changes made following the last review.
6. Force push
6.1 Push vs force push
git push --forceIf you make changes to your local branch via amending commits or the interactive rebase, and you wish to push those changes to a corresponding remote branch, you will to use need to use a force push.
Agit push updates your remote branch based on your local branch, including uploading any relevant commits. The only update permissible via a regular git push command is a fast-forward update.
A fast-forward update, in the context of a git push, is when after copying over all the new commits, git can trace a linear history from the current commit reference of the remote branch (AKA the latest commit on the remote branch) to the commit reference of the local branch we are attempting to upload. This will allow git to "fast-forward" the commit reference to the latest uploaded commit.
In the example below, a command has been executed to push commits i, ii, and iii to the remote branch. As a linear path can be traced from commit B to commit iii, git can "fast-forward' the commit reference for the remote branch from B to iii.

The above restriction is a safety measure to preserve to integrity of your remote branch by preventing you from overwriting your remote commit history.
For the "fast-forward" check to pass, the commits of the remote branch must be a subset of the local branch. Or, to look at it another way, the remote branch cannot contain an ancestor commit which doesn't exist in the local branch being uploaded. As such, a regular git push will always block an amended or rebased branch.
We see this in the example below. Originally commit i-1 was pushed to the remote change. It was subsequently amended and commit i-1 is replaced with commit i-2. When the user attempts to push once more they receive an error message. This is because commit i-1 on the remote branch is no longer contained within the commit history of the local branch and a linear history cannot be traced between commit references i-1 and i-2.
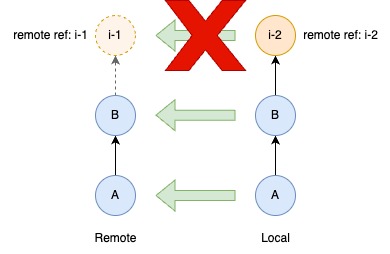
The solution is git push --force. Using the --force command line option bypasses this safety guard and allows you to overwrite your remote commit history. As amending commits or using the interactive rebase overwrite your local commit history, you will need to use a force push to replicate this action remotely.
6.2 Risks of force pushing
The primary risk when using the git push --force command is losing commits. These could either be your own commits if your local branch is not up to date, or other developers' work if its a shared branch. Given the risk, while force pushing is a useful tool, you should deploy it with caution.
Worked example
The example below illustrates the danger of force pushing.
Lets say you have made a change to table to drop a redundant row:

After committing the change, your local commit history reads as follows:

However, at the same time, a colleague has also recently pushed an update to change the currency of the table headers

After pushing the change, the remote commit history reads as follows

If you were to use the git push --force command, the remote history would be overwritten by your local history and the "Change currency" commit would be lost:

Looking at the code on the remote branch we can see the currency has reverted to GBP, completely undoing the changes made by your colleague.
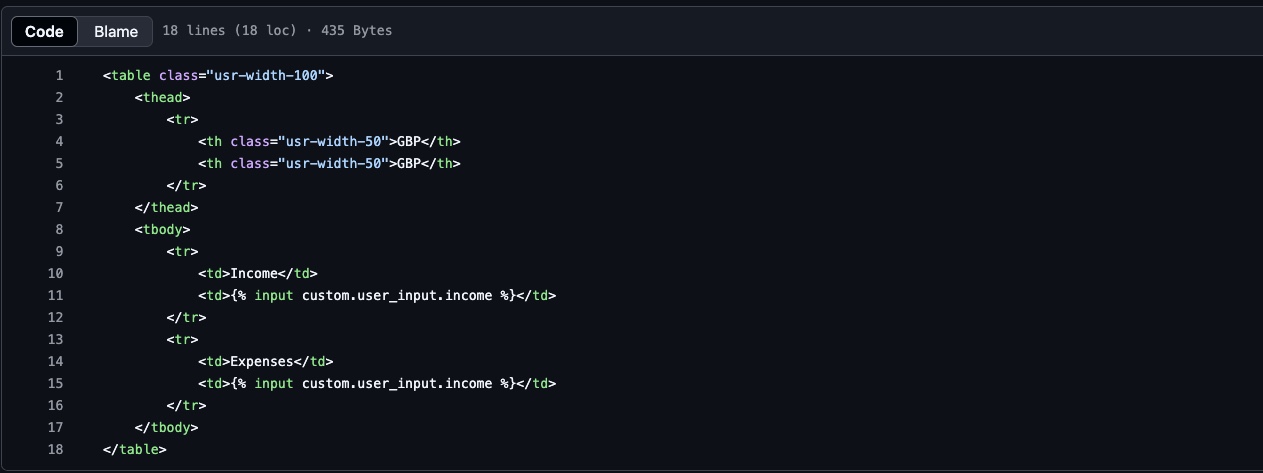
Through this example we can see the inherent danger in using force push in terms of losing commits.
Mitigating the risk
Below are four rules you can follow to mitigate the risks of using a force push:
- Restrict your use of force push to situations where you've run a git command which overwrites your local history (AKA
git commit --amendorgit rebase). Never use for uploading a regular commit. - Before using force push always check your local branch is up-to-date with your remote branch.
- Avoid using force push on any remote branches used by more than one developer.
- Use
--force-with-leaseover--force
Regarding rule 3, most feature branches are simply a mirror of your local branch, and you will be the only developer pushing commits. Meanwhile shared base branches (AKA the main branch and any project branch ) should only be targets for pull request merges, and will not be committed to directly. Therefore using force push on a remote branch used by multiple developers should seldom be an issue.
However, if you do encounter a situation where you need to collaborate with another developer on the same feature branch, you can still use git push --force but be doubly cautious your local branch is up-to-date and stay in close communication with your fellow developers. Especially when you're about to deploy the git push --force command.
Finally using --force-with-lease over --force should also mitigate some of the risk of force pushing to the same feature branch. This is covered in detail in the next section.
6.3 Force push with lease
git push --force-with-leaseWhen using the push --force command to upload changes to a shared remote branch, you can also mitigate the risk of overwriting other developers' work by using the --force-with-lease option in place of the --force option.
A git push --force-with-lease still disables the "fast-forward" restriction, but replaces it with a different validation. It checks whether what you have recorded as the last commit to the remote branch locally matches with what the actual last commit on the remote branch.
By validating the actual against the expected remote commit reference you drastically reduce the risk of losing work. You should still take the recommended precautions when using --force-with-lease as it will only check the commit reference i.e. the final commit. If, for example, an interactive rebase is carried out on the remote branch which impacts earlier commits but not the commit reference, --force-with-lease wouldn't flag your force push as being invalid, and the changes from the interactive rebase would be overwritten. However, if any new commits are added to the remote branch either by yourself or a colleague, --force-with-lease will prompt you to run a git pull before you can upload your own changes.
Given the extra safety it provides, while still allowing you to make amends, we recommend always force pushing using the --force-with-lease option.
Updated 5 months ago
