Git Repositories
Leverage git repositories to develop templates together seamlessly
A git repository is a central storage location for managing and tracking changes in files and directories. Think of it as a folder with subfolders and files, but with very detailed tracking of all changes made in it.
All the template code, going from account templates, reconciliation texts, shared parts and export files should be stored in a git repository. This means that you can always work on your own copy of code on your own machine, while maintaining a "master" version in GitHub. This means multiple people can work on the same template code at the same time. This, and many more benefits make git the industry standard for version control for all types of code.
On this page you'll walk through the process of setting up a new repository yourself, connecting with an existing repository and the flow we like to use during our development process.
1. Create a new repository locally
- Open a terminal, you can do this inside VSCode.

- Navigate to where you want to save your local copy of the templates.
cd ~/Documents
Navigating directoriesWhen running commands in the terminal, it's important you're executing them from within the right directory. This will become very important once you've got multiple repositories on your machine.
Use
cdfollowed by path to navigate to it.
Usepwdto find out your current directory.
Usecd ~to move to your home directory.
Usecd -to move back to the last directory you were in.
Usecd ..to move up one directory. (to the parent directory)
Use.as an abbreviation that represents your current directory.
- To create an empty Git repository in this location, run:
git initYou'll use this when you want to turn the folders you created locally into a git repository (which tracks all changes compared to the remote repository).
- With the Silverfin CLI you could import the template code from a specific firm to your machine in a specific directory, then turn it into a git repository with this command.
- Next, create a repository on GitHub.com. It can be empty, but it should have a repository URL that we are going to use in the next step
- From your terminal, link the local repository to the one in Github:
git remote add origin <repository-url>To check which remote repository you're connect with, you can always use:
git remote -v- At this point, all files within the folder that you have marked as your repository with the git init command earlier, are not present in the remote repository you just created. Therefore the entire content of the local repository needs to be pushed to the remote as a change. To do so, you will need to define the upstream branch. This could be main:
git push -u origin main2. Set up an existing repository (clone a repository)
In most cases you will just create a local copy of an existing repository, instead of creating a new remote repository.
- Open a terminal and navigate to where you want to store the local copy of the remote repository.
cd ~/DocumentsThere are several ways to clone a remote repository to your machine. We recommend either the normal git command with SSH or the GitHub CLI.
You can directly copy-paste the commands you need to clone a specific repository from GitHub. Make sure you've switched to the right tab for this purpose, see the image below (SSH or GitHub CLI)

- Clone the repository by running this command from the terminal
- Navigate into the repository
cd silverfin-cli3. Integrate git in your development process
You have installed git and a repository exists both on GitHub and on your local machine. Now git commands can be used to manage version control of the code in the remote version. Which commands we use exactly, and at which moment, is closely aligned with the development flow for liquid templates.
3.1 Git flow
- You start a new development task. If there's a system with tickets in place, then this would correlate with moving the ticket to "in progress".
- You update your local clone of the repository so you always start from the most recent version of the codebase.
- You move to the main (or master) branch first if applicable
git checkout main
git pull
Feature branchesWhen you're working on a big new release that involves updates to several templates, which you want to launch simultaneously, you could use a feature branch.
You will then always start from the latest version of that feature branch instead of main/master, and will merge your own branch with the feature branch. Once the feature is ready to be released, you merge it into main/master.
- You create a new branch for the assigned task specifically.
- In Jira you can set up a connection with Github based on the branch name. You can get the command from your ticket or even through an extension on VSCode. With this command you create a new branch and switch to it in one go.
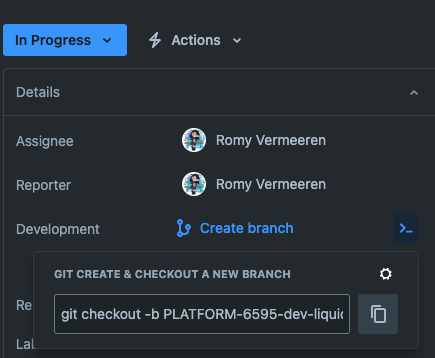
git checkout -b <branch_name>You can switch branches with git checkout <branch_name>
You can create a new branch with git branch <branch_name>
You can get an overview of all the branches with git branch
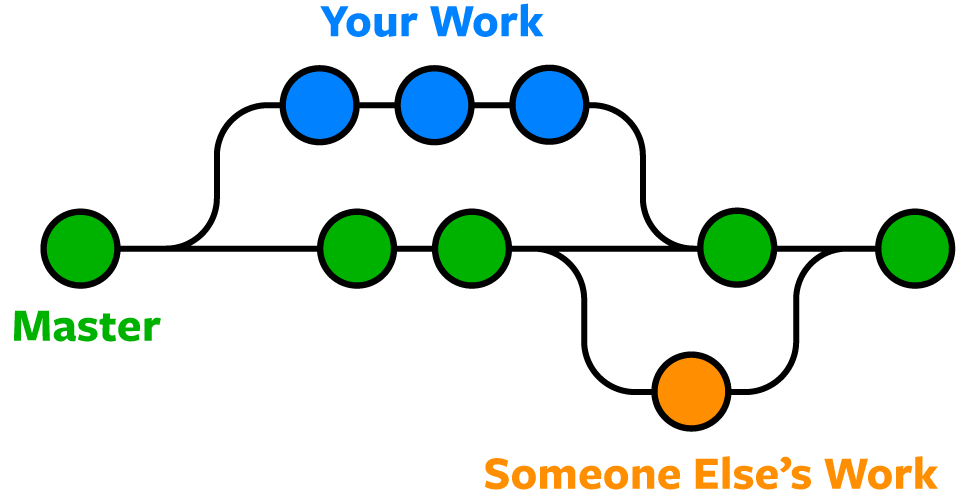
Branching allows multiple people to work on the same template without necessarily interfering with each other.
You write your update on your branch, once you’re done it will be merged with the main branch and your branch can be deleted.
- You adjust a file. As with any other local copy of a file, you need to save your work. Press CMD S or CTRL S.
- Once you're happy with the work you've done, maybe you've finished up a specific part of the task that was assigned to you, you bring the saved changes to the so called "staging area".
git add .This command will stage all the changes you've made so far. If you only want to stage the changes in a specific file, you need to specify every file you want to include.
git add <file>The changes that you stage will be part of your next commit. Ideally each commit represents a single or at least coherent change to the codebase. For example, if your template exists out of 3 different tables, you could stage your changes once the first table is built and write your first commit. This becomes even more relevant when your change includes multiple files, for example if you also added translations to a part and introduced a new result in another reconciliation text.
- You can review your staged changes before committing them. (optional)
git status
git status --short
git diff --cached
In VS code, it is possible to click on the staged change in the source control section, to see the differences with the branch origin.
- You've finished a piece of code and are ready to commit it.
git commit -m "description of the changes"Commits are crucial as they capture your files at a specific point in time and serve as anchor points in the historical record of your repository. You'll be able to look at the state of the codebase at the time of any specific commit. You can always rollback to a previous commit. If you commit frequently and in meaningful chunks, the commit log becomes a very useful tool for anyone else who looks at the same repository. The changes to the project are easier to read, track, review and debug.
For an overview of your commits, run:
git log
git log --oneline- You will repeat steps 4-7 multiple times until the work for this particular task is done.
During development, it is good practice to regularly rebase your code. By rebasing you add commits that have been made to the main branch (or feature branch) chronologically to your local branch. Take the following steps: Switch to main, update main, switch to your local branch, rebase your branch:
git checkout main
git pull
git checkout <branch name>
git rebase main- After finishing a number of commits (and rebases), you can send your committed changes to the remote instance of your current working branch (the "upstream" branch):
git pushYou don't have to wait until all the work is finished to push to the remote repository. As soon your work is ready on your own branch, you can push your commits to the upstream branch. This could be useful if you want to share a piece of code with another developer that's part of one of your commits, even though you're not ready yet with the task as a whole. Your changes will be gathered in the remote version of your branch, which is the place where they will later be reviewed and merged with main. I.e. pushing to the remote branch does not mean your code is ready for review.
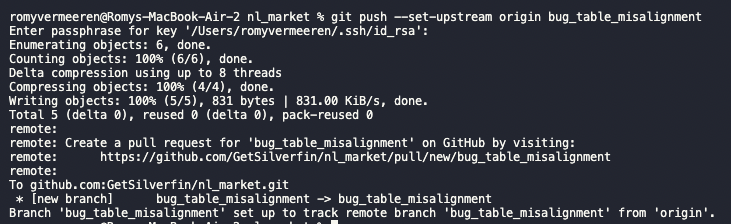
If it's the first time pushing your code from your local branch to the remote repository, you'll get an error from git because the branch does not have an upstream branch yet. But it will also give you the command you need to run to set the upstream. Easy!
git push --set-upstream origin [branch name]
- After you've pushed your code, you'll receive the suggestion to create a pull request. A pull request is a page on GitHub that all team members can use to approve your upstream working branch to be merged into the main branch. You can visit the link provided in your browser to finalize the PR.
- You can open Pull Requests either on Github or use the Pull Requests extension in VSCode. With the latter you can checkout the branch of a PR, view the changes, add comments and even start making changes on the current state of these files. This comes in handy when you are the code reviewer of a PR.
Typically your request will be reviewed by someone else. If you're using a ticket system like Jira, this is the point where you move your ticket to "In Review". - Once the PR pull request is approved by the reviewer and all github actions pass, you can merge the pull request on Github and with the extension. You can also merge branches in your local repository though.
git merge <branch name>Another common approach is to rebase your code. By rebasing you add commits that have been made to the main branch (or feature branch) to your local branch. It's good to rebase regularly if it takes a while for you to finish the task at hand. Take the following steps: Switch to main, update main, switch to your local branch, rebase your branch.
git checkout main
git pull
git checkout <branch name>
git rebase main- Once the Pull Requests has been approved and merged into the main branch, you can delete your branch.
(but make sure you're not in a branch you're about to delete!). If there's no outstanding changes to documentation or tests, you can move your ticket to done.
git checkout main
git branch -d <branch name>
3.2 Git best practices
When developing templates, communicating the intent of your work to another developer - in particular one with little to no knowledge of the code - is no less important than the actual work itself. The other developer could be a current colleague, a new joiner, or even yourself in 6-12 months. Without good communication, a cost will inevitably be incurred when work is next carried out on the template, both in terms of additional time taken and an increased risk of error.
The commit history is a central part of this developer-to-developer communication, and communication should be the driving purpose behind all decisions when crafting the commit history. Your commit history should tell a story, breaking down the development into a series of descriptive, logical, and sequential steps, which allow any other developer to understand your work regardless of length or complexity.
To create a well-formed commit history, follow these 3 core principles:
- Atomic commits
- Descriptive commits
- Commits as a "living" history
Finally, by following the above principles and focusing on communication, you should also find - almost as a byproduct - the commit history also becomes far more useful as a tool of development.
Atomic commits
An atomic commit is a commit which represents a single, indivisible change. By breaking your commit history into a series of individual logical units, you will be able to construct a clear, step-by-step narrative of how a feature was constructed. This will be invaluable to both reviewers and future developers looking to understand the feature. An ideal atomic commit history is one where a colleague could review the code changes commit-by-commit.
For example, say you are creating a template with 3 tables: A, B, and C. Table A and B both have a single function, so you make two commits: One for each table. Table C is more complex, with a primary function, and a secondary verification function built on top, so you split the change into two commits. Your final commit history appears something like the below:
Create Table A
Create Table B
Create Table C
Add Table C input verification logic
You can see from the above example, the development of the template is now very easy to follow and for a developer to locate specific changes.
Such an approach also removes the “noise” from your code changes, making it more understandable. For example, if indentation changes, comments etc are in separate commits from code changes, it becomes far easier for a reviewer to isolate any important areas of focus.
We can use our earlier example to illustrate the above, with a new commit - "Clean-up indenting":
Create Table A
Create Table B
Create Table C
Clean-up indenting
Add Table C input verification logic
A reviewer can now both make a judgement call to skim over the “Clean-up indenting” commits and will spend less time reading the other commits as they no longer contain the “noise” of changing the code indentation.
Furthermore, by introducing atomicity, your commit history will gain modularity. Meaning as a developer, you will find it far easier to drop or transfer commits while working on a feature. For example, if it was decided Table B was no longer required, it would only take a single command to remove the table and all related code from the feature branch.
Finally, by embracing an atomic paradigm, you will train yourself to break down and plan out your development approach in advance.
Descriptive commits
The commit description is the most visible element of git commits as a form of communication. Assuming the commits have been split into individual logical units, the attached message should communicate the intent of the unit.
To craft a well-written, descriptive commit messages, there are two principals to consider:
- Content
- Format
For Content, focus on the “what” and the “why” of a change rather than the “how”. In other words, talk in the abstract, rather than in terms of the concrete code changes made.
For Format, messages should have consistent structuring. Structuring will make the description more readable. Conventional commits offer a structure specification, which can be a good starting point to then tweak to your firm’s needs.
At Silverfin, we advise using the following framework for structuring git commit messages:
- Separate subject from a body with a blank line
- Limit subject line to 80 characters
- Capitalise the subject line
- Do not end the subject line with a period
- Use the imperative mood in the subject line
- Wrap the body at 80 characters
- Use the body to explain what and why over how (see content rule above)
Finally, whatever structure framework you decide upon, you should ensure that you are consistent in its use, so any developer reading any commit message can always expect it to have the same format.
Commits as a "living" history
It is easy to view the commit history as a static record, each commit an unchanging, indelible entry, and that the only recourse for amendments or corrections is additional commits. However, to maintain the integrity of your atomic commits, you must embrace the idea of the commit history being a living, dynamic history.
During the development process there will inevitably be amendments, either from changing requirements, experimentation, or simply from fixing mistakes. Rather than creating new commits to action amendments, there are a plethora of git commands available to alter your previous commits to incorporate your desired changes.
For example, here is the git commit history of our current project:
Create Table A
Create Table B
Create Table C
Add Table C input verification logic
Let us say the requirements come back that Table B is to be used in a separate template and you also realise you’ve made a mistake in the Table C verification logic. It might be tempting to fix this via two additional commits:
Remove Table B
Fix Table C input verification logic
However, through careful use of git commands, you can drop the Table B commit and alter the Table C verification logic commit, to produce a new commit history as follows:
Create Table A
Create Table C
Add Table C input verification logic <!--code updated with new logic-->
The integrity of the commits has been preserved - each still contains the same logical function as before - simply the execution has been changed. By taking such an approach your commit history will only show the final version of your solution, rather than any intermediate tangents or deadends, making the commit history concise and cleaner.
Coming SoonDetailed guidance on git commands you can use to alter your git commit history
Updated 11 months ago